|
|
|
|


Instructions: Coffee
Cup Turbine
By: David Willis, Associate
Professor, University of Massachusetts Lowell
This work was supported
by a grant from the Massachusetts Clean Energy Center (MassCEC).
The materials presented do not necessarily reflect the opinions of the MassCEC.
We are grateful the MassCEC for their support and encourage you to look at some of their
online resources.

|
Step 1 Before
Starting: Read and understand how to do this activity safely |
|
· Be sure to have an adult
help you when cutting parts. · When testing your turbine,
be sure to wear safety glasses · When testing your turbine,
make sure the spinning blades are far away from your face/your body |
|
Step 2 Constructing
your wind turbine tower and nacelle |
|
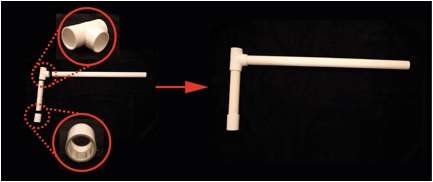
· Collect the following items: o 1 x Long piece of 1” PVC pipe
(~18 inches long). o 1 x Short piece of 1” PVC pipe (~2-6 inches long). o 1 x PVC 1” TEE fitting o 1 x PVC 1” Pipe Coupler
fitting · Push the shorter and longer
PVC pipes into the TEE fitting as shown below. · Push the pipe coupler
fitting onto the end of the short PVC pipe as shown.
You now have
your wind turbine Tower and Nacelle! |
|
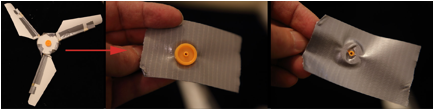
Step 3a Assembling
your wind turbine rotor and generator. |
|
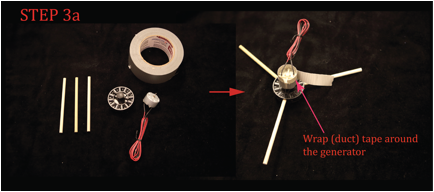
· Collect the following items: o 1 x Roll of Duct Tape (or
any other tape you may have) o 1 x DC generator (http://www.vernier.com/products/kidwind/wind-energy/kw-gen/) o 1 x wind turbine hub (note:
we will show you how to make a hub later in this instruction manual) (http://www.vernier.com/products/kidwind/wind-energy/kw-wth3/) o 3 x wooden dowels or 3 x wooden
pencils. · Connect the generator to
your hub. · Loosen the screw knob on the
hub · Insert the dowels into the
hub and tighten the screw knob. · Take a strip of duct tape
and wrap it around the generator. This will ensure a tight fit between the
generator and the nacelle.
Your wind
turbine rotor, generator and hub are assembled! |
|
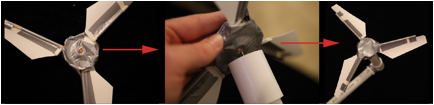
Step 3b Installing
the generator on the tower in the nacelle |
|
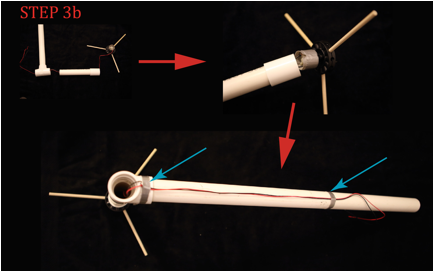
· In this step you will
install the generator in the nacelle/hub of your wind turbine tower. There
are a few steps: o Start by removing the short
PVC pipe from the TEE fitting o Next, pass the red and black
wires into the pipe, through the TEE fitting. These wires will carry the
electricity out of your turbine generator. o Carefully press the
generator into the PVC coupler fitting. Increase/decrease the amount of tape
wrapped around the motor to ensure a snug installation. · Reassemble the PVC tower
(press the TEE fitting together again) · Add some strips of tape to
attach the wires to the tower.
You are now
ready to go and design some wind turbine blades. The turbine is almost
done. |
|
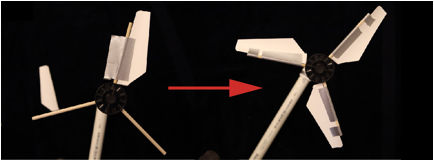
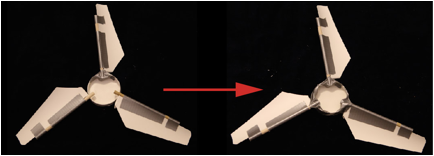
Step 4a Designing
your blades |
|
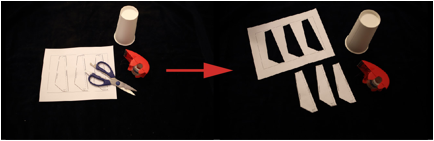
· Now we will explore the
blade design process. For this we will use a simple, 20oz Coffee Cup. Once
you have built one set of blades, you can try any number of modifications to
improve your wind turbine performance. · Collect the following
parts/equipment: o 1 x Safe Scissors (be sure
to ask an adult to help you use the scissors) o 1 x cardboard coffee cup o Some clear tape or glue
stick o The blade design template (see
below this step), or click here for a PDF. ·
Once you have all the equipment/parts cut out the wind turbine blade
templates.
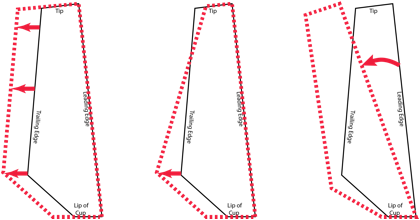
· Once you cut out the wind
turbine blades, you will use them as templates for the actual blades. To do
this, you should stick the paper templates on your cup. o Hint:
Keep the printed writing facing you when you tape the template on the cup. o Hint: Put the root of the blade into the lip
of the cup (where it says “lip of cup”).
|